Sharepoint Document Management is among the most well-respected and reputed of all document management systems. The proper and organized management of documents is essential to the success of any business. Sharepoint is one of the better systems designed to help companies expertly manage their documents.
Sharepoint gives organizations the tools to handle day-to-day operations with programs that they are already familiar with, for instance, Microsoft Office applications such as Word and Outlook. Sharepoint also supports every stage of the document life cycle.
ASPHostCentral.com, as one of the SharePoint 2010 Hosting Providers, proudly confirms that we do support both SharePoint Foundation 2010 and SharePoint 2010 Server Hosting.
During the document management planning process, companies tend to follow certain steps. They often times first determine document management roles. This will generally involve determining who in the organization will be involved in the document management process and in what role. Sharepoint can help individuals identify who these employees will be. This can be especially helpful for companies or executives who don’t have much experience in this regard.
Next, it will be necessary for organizations to figure out what documents will be needed. These will include forms used daily and those that will only be used sparingly. Again, companies will find that Sharepoint will walk them through this process.
The proper organization of documents is important to every company. When it is done correctly and in a way that is intuitive to those who will be using the documents, life becomes much easier for everyone involved. Using Sharepoint, companies will find that they are able to organize documents in a variety of ways including document libraries and records repositories, amongst others.
In addition to the aforementioned, companies will also find that they are able to organize documents based on content type (policies, metadata, workflow processes, etc.). This helps create much needed consistency when it comes to the management of a company’s documents, which is extremely important. Having a document management system in place which that makes accessing and working with documents easy, will help companies save both time and money. Workflow planning, content control and the development of information management policies are also made possible using Sharepoint.
Overall, Sharepoint is a very good document management system. The proper management of documents is crucial to the smooth running of an office or organization. Document sharing, collaborative authoring, archiving and keeping confidential documents protected are just a few of the document management capabilities Sharepoint offers users. Companies in need of a quality system to manage their documents should consider it. It will require that a company own certain hardware and software programs, which is something that will need to be taken into consideration before a company opts to use it as their document management system
0a988dda-32e8-447c-be0c-ca19288fe2ea|0|.0
If you are looking for a web hosting plan that works as hard as you do then SharePoint hosting 2010 is exactly what you need to get the job done. As a matter of fact, SharePoint hosting services provides you with an easy way to build a top performing team. As you begin comparing different plans you will have a whole new perspective on the best methods for communicating with your team.
SharePoint hosting 2010 gives you the competitive edge necessary for collaborating and connecting with your employees on a daily basis. Thanks in part to the latest technology, SharePoint hosting services puts you in absolute control of all your data and places all your documents at your fingertips with a few clicks of the mouse. Stay in contact with an unlimited number of employees in confidence, knowing that your information is being transmitted over a secure network.
To get remarkable results, you have to choose the SharePoint hosting 2010 plan that compliments your business. Think carefully about the amount of disk space you will need to accommodate your staff because the cost of SharePoint hosting services will vary based on that factor. You can get as little as 500MB of disk space or as much as 50GB of disk space.
Each SharePoint hosting plan has the added benefit of project collaboration, document sharing and mobile access for every single customer. No doubt about it, SharePoint Hosting 2010 gives you the clear advantage by helping you bring your company together in a social networking environment. You won’t be disappointed because you will also receive free SharePoint templates to enhance every area of your business. Use them to manage your help desk or track a sales campaign.
Everything you need to create the ultimate virtual work environment can be found in SharePoint hosting services. Everyone on your team will be able to work immediately on documents being stored on the hosted SharePoint WSS in a central location. What’s more, Microsoft Office applications flow in a natural and seamless way with SharePoint 2010 hosting.
Give every staff member a blog to share company information and ideas on specific documents when you host with SharePoint. You’ll absolutely love being able to set up and share calendars among team members. Mobile access is also a dynamic feature that you will come to appreciate when you choose SharePoint hosting.
An exciting new way to share contact information with the members of your team is to use SharePoint to synchronize your contact list with Microsoft Outlook and your mobile phone. Task management is a SharePoint hosting feature that nearly all managers appreciate because specific tasks can be created, listed and assigned quickly. Plus, every member will have the opportunity to monitor how a project is unfolding on an ongoing basis.
SharePoint hosting 2010 is definitely the best fit for tomorrow’s business needs. It comes through in a clutch and more importantly, it really works. Bear in mind that SharePoint offers both shared and dedicated hosting plans and you can choose based on what is appropriate for your employees. If you want a automated hosting solution that practically runs itself, and saves you money, then SharePoint hosting will definitely keep you ahead of the game and help your entire team work smarter.
cdcd4622-d118-4d2d-8967-0409f56f9375|0|.0
7ee83e5f-2821-4837-8016-195e4e7de0ed|0|.0
In SharePoint 2007, if you created a new site collection using the ‘Collaboration Portal’ template, it would come with a number of sites, including the Search Center. In SharePoint 2010, this is no longer the case. There isn’t a Collaboration Portal template for starters, the nearest you’ll find is the Enterprise Wiki template which is my recommended starting point for Intranets, KM and Collaborative Sites. (Side note: Another example of poor usability on Microsoft’s part. The Enterprise Wiki template is available in both the Standard and Enterprise editions of SharePoint 2010. When you read about features with ‘Enterprise’ in the title, don’t assume they are limited to the Enterprise Edition, in most cases they are also available in Standard.)
In SharePoint 2010, the clue is in the search box:

When you create a new site collection, the default search settings limit search to within the current site only and uses built-in search pages. If you want to search across multiple sites (a fairly normal requirement for most internal SharePoint deployments), use search scopes and configure different types of results pages, you will be wanting a dedicated search site. Here’s what to do:
Create a Search site
1. At the root of the site collection where you want the Search site to live, click Site Actions and select ‘New Site’
2. Select the search site template you want to use
3. Enter a title and URL (Search works for me…) and create the site
There are up to three search site templates to choose from (and you should use a search template if you don’t want to create a lot of extra work for yourself setting up search query and results pages):
1. Basic Search – available with all versions of SharePoint
2. Enterprise Search – requires SharePoint 2010 Server: Standard or Enterprise edition (yes, another of those ‘Enterprise’ features also available in Standard)
3. FAST Search – requires SharePoint 2010 Server Enterprise Edition (or FAST add-on/dedicated)
The search query box is automatically integrated every SharePoint site within the global navigation bar (as shown in the first image above). Unless you particularly want to also have the Search site listed in navigation, go into the Navigation settings and hide it.
Configure Search Settings
Once you’ve got your search site, you can now configure the search settings to use it. This step needs to be repeated for each site collection that you want to point to the Search site.
1. At the root of the site collection, go to Site Actions – Site Settings.
2. Under Site Collection Administration, click on Search Settings
3. Within Search Settings:
- For the Site Collection Search Center, enter the URL to your search site in the format /search/Pages (replace the word ‘search’ with the site URL for your search site, if different))
- In Site Collection Search Scopes dropdown mode, select ‘Show search scopes’
The image below shows the settings for my demo machine:
4. Click OK and you’re done.
Once the search settings are configured, the search box will show scopes with the default set to search across all sites instead of just the current site:
Don’t forget, you’ll need to configure search settings for each site collection that you want to point to the Search site. Whilst the URL will be relative for the site collection where the search site is located, for all other site collections you will need to enter the full path (for example, on my demo the URL is http://sp2010/search/ for all other site collections)
Enter a search query in the new search box and you will be routed to the Search site to display results:
In the image above, I’ve configured the default results page in the Search site to also include federated search results. When I enter the query ‘SharePoint’ I can see documents and items on the Intranet (along with refiners on the left to filter results), people who have SharePoint in their profile and federated results YouTube.
a04a41a6-fcfb-428b-8288-4aaf2ab40bba|1|1.0
ASPHostCentral.com, a premier provider in advanced Windows and ASP.NET hosting service, proudly announces the support of .CSHTML file hosting on our newest Windows Server 2008 Hosting Platform.

"One of the benefits is that Razor views can be rendered inside unit tests, this is something that was not easily possible with the previous ASP.Net renderer," said Tom Heinrich, General Manager of ASPHostCentral.
“Unit Testable: The new view engine implementation will support the ability to unit test views (without requiring a controller or web-server, and can be hosted in any unit test project – no special app-domain required).," said ASPHostCentral.com Senior Support Specialist, Ryan Dalgish.
For more details, please visit: http://www.asphostcentral.com/Windows-Shared-Hosting-Plans.aspx
About ASPHostCentral.com:
ASPHostCentral is a premier web hosting company where you will find low cost and reliable web hosting services. Whether you're an enterprise level business or a small business entity or someone who just wants to host his own personal website - we have a suitable web hosting solution for you.
For more information, visit http://www.ASPHostCentral.com
f4a667da-2b3e-4d29-a8d1-feb5ad41054e|0|.0
Recap
Search scopes improve the SharePoint search experience by letting users search over a subset of information within an organisation. For example you can create a search scope for a specific project or a group such as Legal or Marketing. Search scopes can either be created globally at the search service application level so they are available to all site collections, or defined within a specific site collection.
Creating search scopes
Global search scopes in SharePoint 2010 can easily be created using PowerShell commands such as New-SPEnterpriseSearchQueryScope. Corey Roth covers this in his article on Creating Enterprise Search Scopes with PowerShell. While the PowerShell method can also be used to create site collection related search scopes you might also want to do this programmatically in a feature receiver. Another thing you might want to do programmatically is to associate a search scope with a display group such as the ‘Search Dropdown’ so it appears in options next to the search box.
As there are problems with some of the methods that can be used to create search scopes and display groups programmatically I’ll detail these in this article. In a follow up article I’ll cover a method of creating scopes and scope display groups that avoids these problems.
The object model classes I will cover in this article are:
- SearchContext
- SearchServiceApplication
- SearchServiceApplicationProxy
SearchContext
This is only included as it is referenced in other articles and was a common way to create scopes in SharePoint 2007 such as in the code shown below.
In SharePoint 2010 this class is marked as obsolete and should not be used. If you use the SearchContext class in your code you will get the following warning at compile time:
“This class is obsolete now. Please use SearchServiceApplication and SearchServiceApplicationProxy instead.”
According to the article Microsoft SharePoint Server 2010: Deprecated Types and Methods:
Obsolete types and methods will continue to work in your custom code and solutions, but they will generate compiler warnings, and you should update your code to use the new types and methods as indicated by the compiler warnings.
So while this might work it may not always function as expected and there is no guarantee it will continue to work in the future. Next we will look at the alternatives suggested in the compiler warning message.
SearchServiceApplication
If you are updating SharePoint 2007 code the SearchServiceApplication class is an obvious choice as it is a suggested alternative to the SearchContext class. The code is slightly more complicated as you need to retrieve various classes relating to the search service application but a similar outcome can be achieved using the code below:
There is a fundamental problem with this code, however (on top of the hardcoded strings and a complete lack of error handling). The code tries to access the search service application database directly without going through the search web service. In a least privilege installation this means that the application pool account of the web application containing the site collection will be used (even if you elevate privileges for this code) and will not have access to the search service application database by default (as least privilege requires separate accounts for search and content). The specific error message you get when running this code is:
System.Data.SqlClient.SqlException: Cannot open database “Search_Service_Application_DB_{…}” requested by the login. The login failed. Login failed for user ‘{0}’. at System.Data.SqlClient.SqlInternalConnection.OnError(SqlException exception, Boolean breakConnection)

In the example above DEVDOMAIN\spcontent is the identity of the application pool of a web application that contains the content sites for which I want to create search scopes. Using the code above the spcontent account is trying to access the database directly as shown below:
This is something to watch out for as if your dev machines are not running a least privilege installation but your production servers are the issue may not manifest itself until it is difficult and costly to fix.
What we need to do is go through the web services so the account running the search web service (in this case an account named DEVDOMAIN\spservices) is used to connect to the database as shown below:
In the screen shot the intuitively named a168dee… application is the search web service.
This brings us on to the next method mentioned as an alternative to the SearchContext class – the SearchServiceApplicationProxy class.
SearchServiceApplicationProxy
This class requires the use of ScopeInfo and DisplayGroupInfo objects and requires some lower level code such as passing around the ID’s of the display groups. This does get around the database access issue metioned above, however, as it goes through the SearchServiceApplicationProxy class which uses the search web service instance.
While this method works, it requires a lot more code than the methods above and isn’t as intuitive. What used to take 9 lines of code in SharePoint 2007 now takes 30 lines and requires us to pass round the Id’s of scopes and display groups and managing the list of display groups in our code.
So to summarise we have found that:
- SearchContext is now obsolete (and can also cause permission issues)
- SearchServiceApplication can lead to permission issues if called from within a feature receiver as it doesn’t use the search web service
- SearchServiceApplicationProxy uses the search web service but requires much more code and is difficult to work with
6d3ea7d6-6c8c-4ccd-85bc-974181fe1f09|0|.0
Findability is one of the most important factors in the success of a SharePoint site. If users cannot find what they are looking they will quickly use alternate methods to get results. Employees that cannot find information are less productive and less likely to use the system in general. Likewise users that cannot find information on an internet site will look elsewhere for products and services losing the company revenue.
SharePoint 2007 introduced some powerful tools for improving findability but fell short when it compared to larger Enterprise Content Management systems. SharePoint 2010 takes this a huge step forward with cutting edge enterprise ready findability features. Here are 10 new features SharePoint 2010 brings to the table in addition to the features available in SharePoint 2007.
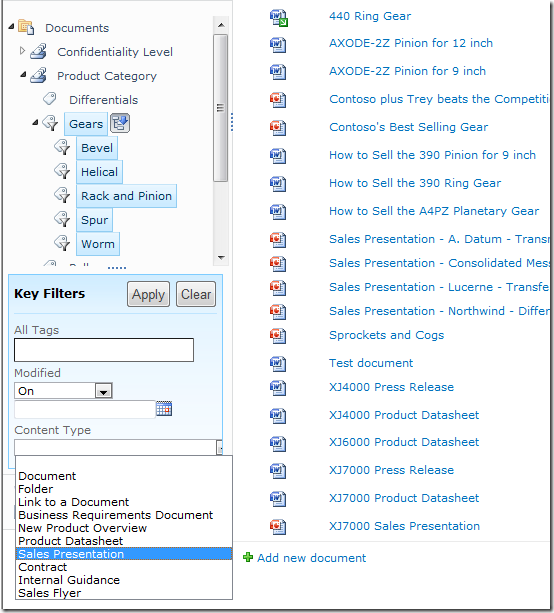
1. Metadata driven navigation
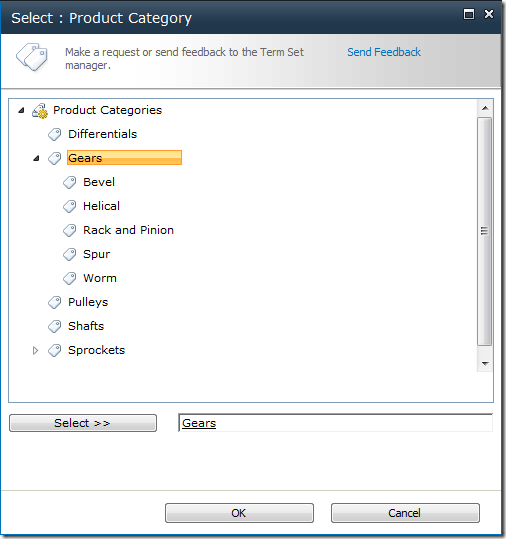
SharePoint 2010 provides a rich set of features that allow users to use metadata to navigate content repositories. Document libraries can be configured to show navigation based on both the corporate taxonomy (or managed metadata) and combined with other metadata filters. For example with a you can filter items from the ‘Bicycle’ product category of content type ‘Sales presentation’ using the navigation as shown below.
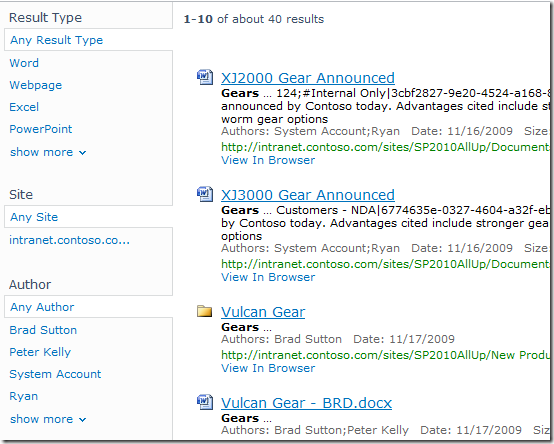
2. Search enhancements
SharePoint 2010 includes some impressive enhancements to the search experience. Search facets allow users to filter the results by relevant metadata such as author or content type. Relevancy is improved as it takes the number of views into account. This, along with the addition of related queries, improved query syntax and thumbnail previews help users locate the content they are after.
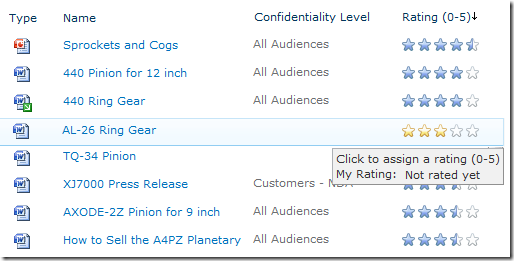
3. Ratings
The introduction of a ratings field allows community driven content classification. Ratings can be used to improve findability through sortable list columns, or by the creation of ‘highest rated documents’ rollups using the Content Query Web Part, allowing users to see popular content in prominent places.
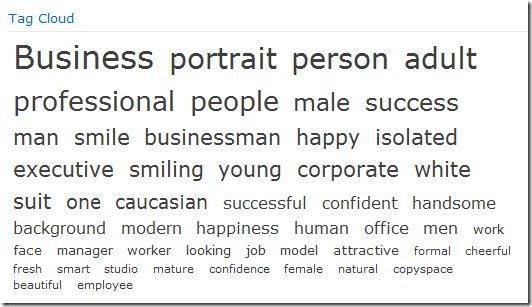
4. Tagging
SharePoint 2010 includes a tag cloud web part that provides a visual representation of the metadata associated with the content inside a repository. Additionally tag profile pages contain lists of items such as sites, documents or people tagged with a particular term as well as a list of community members and discussions facilitating information retrieval.
5. Document IDs
SharePoint 2010 provides a unique Document ID service that can be used to create absolute references to content regardless of file renames or content moves. As well as resulting in a reduction in broken links the Document ID can be used to search for an individual document and the format of the ID is configurable allowing organisations to create meaningful document identifiers.
Classification
All the findability improvements mentioned above rely on the correct classification of content in the first place. The following five findability improvements aid the correct classification and organisation of content in SharePoint 2010.
6. Managed metadata service
SharePoint 2010 now includes a dedicated service for managing metadata within the enterprise. The managed metadata service allows content owners to maintain a centrally managed structured taxonomy as well as allowing users to contribute to an unstructured ‘folksonomy’ in the form of managed keywords. This makes it much easier for users to classify content, and guides users to use consistent terms, improving the quality of metadata in the system.
Structured classification:
Unstructured classification:

7. Shared content types
One key architectural limitation in SharePoint 2007 was that Content Types could not be shared between site collections. This resulted in the duplication of content types and associated lookup lists which could become out of sync over time. SharePoint 2010 removes this limitation and thus improves the consistency of information stored in different site collections or even separate SharePoint farms.
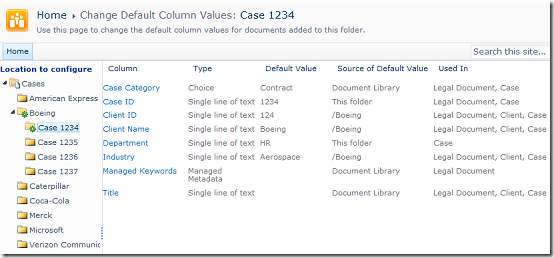
8. Location based metadata defaults
SharePoint 2010 allows you to set metadata defaults at the document library and folder level. This means that users do not have to enter the same metadata over and over if they are uploading content into a repository that has a shared set of metadata.
9. Content Organiser
In SharePoint 2007 the location in which content was stored was largely up to the end users. The Content Organiser in SharePoint 2010 helps alleviate problems caused by users uploading documents to a variety of different places by allowing routing decisions to be centrally managed. Content can then be routed to the correct location based on the content type and other metadata values. This helps the user to focus on providing quality metadata and results in a well organised repository.
10. Document Sets
A document set allows you to manage a group of documents as a single entity. The ability to apply metadata to the entire set of documents improves consistency and storing related documents together can help users find relevant material easily.
Summary
SharePoint 2010 delivers some massive platform improvements that help in the classification and retrieval of content. It is important to note, however, that the toolset is only a small part of an information management strategy. Information management should start with clear business objectives, a clear strategy and right areas of focus before technology is involved. Once this is in place, however, the significant advancements of SharePoint 2010 make it a more obvious choice for content management than ever before
6b09d2d8-0ba7-4071-bc05-bb26686ba76e|0|.0
The SharePoint 2010 Health Analyzer is a great way of getting information about the state of your SharePoint farm. It checks things including disk space and database fragmentation and other security, performance and configuration issues. If the health analyzer finds issues you are presented with a message when you browse to the Central Administration site. There is also a link to find out details of all problems that were found.

One thing to note, however, is that it can take a few days or weeks before all the health rules are run on the default schedules. When building a new farm it can be useful to get instant feedback, so you can make sure the new installation is in a healthy state. Did you remember to remove the farm account from the administrators group after setting up User Profile Synchronization? I find this helpful as a consultant as I can rectify issues such as disk space or other problems while I’m on-site with a client and avoid having to return if something is missed.
To get instant feedback you can run all the health analysis jobs immediately through PowerShell. Note that this will place some load on your system so running this on a live environment should be done with caution but in the case of a fresh build with no users that is unlikely to be an issue.
To run all the jobs immediately fire up a SharePoint 2010 Management Shell as a farm administrator and drop in the following PowerShell:
$jobs = Get-SPTimerJob | Where {$_.DisplayName -match "Health Analysis Job"}
foreach($job in $jobs) {
Write-Host "Running" . $job.DisplayName
$job.RunNow()
}
You should now see any problems appear in the Health Analyser screen, ready for you to address while you are on site before the client sees an angry red message when they use Central Administration the next day. Note this can take a few seconds to update so check the timer job history or the modified column to ensure the latest results are showing.
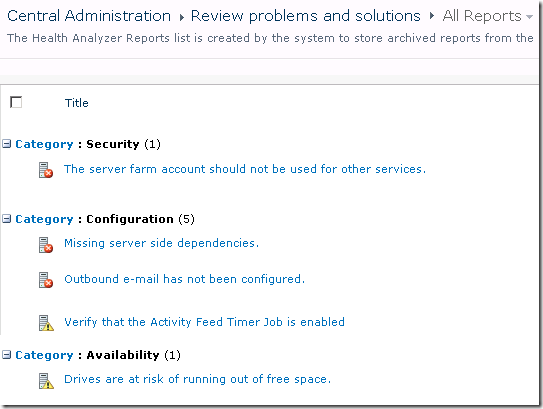
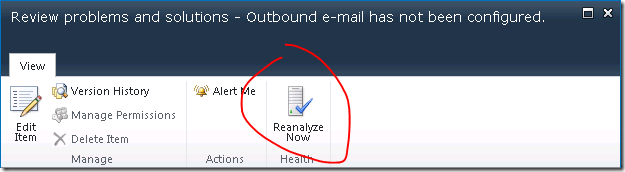
Once you have fixed the issues you can either run the PowerShell again or check the rules individually using the Reanalyze Now button that is displayed within each problem.
Missing server side dependencies.
Explanation: [MissingWebPart] WebPart class [8d6034c4-a416-e535-281a-6b714894e1aa] is referenced [6] times in the database [AdminContentDB], but is not installed on the current farm. Please install any feature/solution which contains this web part. One or more web parts are referenced in the database [AdminContentDB], but are not installed on the current farm. Please install any feature or solution which contains these web parts.
Solution: Following the steps in the article Missing Server Side Dependencies – 8d6034c4-a416-e535-281a-6b714894e1aa to browse to the SearchAdministration.aspx and SearchFarmDashboard.aspx in Central Adminstration and perform an iisreset seemed to fix the issue for me.
The server farm account should not be used for other services.
Explanation: DOMAIN\spfarm, the account used for the SharePoint timer service and the central administration site, is highly privileged and should not be used for any other services on any machines in the server farm. The following services were found to use this account: User Profile Synchronization Service(Windows Service)
Solution: Unfortunately I don’t have an easy fix for this one (assuming it is referring to the User Profile Service – any other services should not be running as the farm account). Spence and Spence on TechNet both indicate the farm account must be used to run the User Profile Synchronization service application. Changing this to any other managed account seems to break the UPS app so if you know how to avoid this please let me know.
Verify that the Activity Feed Timer Job is enabled
Explanation:The newsfeed displayed on My Site and Profile pages uses the Activity Feed Timer Job. Without this timer job, no newsfeed will be available on My Site and Profile pages. This also applies to any third-party product that uses this newsfeed.
Solution: Start the User Profile Service Application – Activity Feed Job from the Monitoring > Job Definitions page in Central Administration.
As a side note some of the common non-trivial messages are:
22269d33-58ca-415a-9b14-a8a5a025ae12|1|2.0
Status Indicator is a report type, where it shows and compares the actual performance of particular measure with goal value. Without doing any calculations, you can know the performance of a measure with good status indicator. You can know whether measure results are on target or off target. This post explains how to create a status indicator in SharePoint 2010.
Status Indicator shows name, results and icon. It provides a quick information, green icon indicates good performance, Red icons flags the problem areas and yellow icons warn of potential problems. The typical status indicator looks as follows

Creating status indicator
status indicator is an item in status list in SharePoint. You can create a status list in two ways
1. Create a status list
2. Create a web part with status list
Creating a Status List
Create a Status List in the Business Intelligence Center site in SharePoint. You can add status indicator once you create a list. Steps to create a list
1. click Site Actions, and then select View All Site Content, click create option as shown below
2. On Create page, click the Status List icon
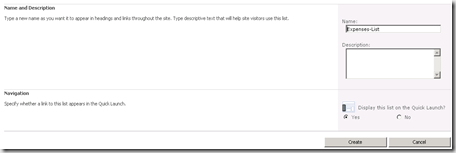
3. Enter name and description for Status List as shown below
Create a Web Part with Status List, take these steps
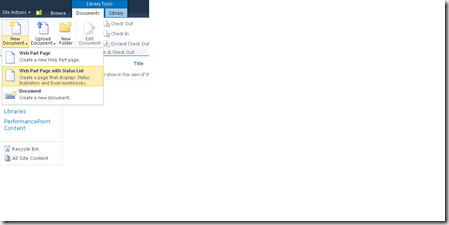
1. Click Dashboards from BI site quick launch panel
2. Click Documents tab in the Library Tools group
3. Click New Document, and then select Web Part page with Status List
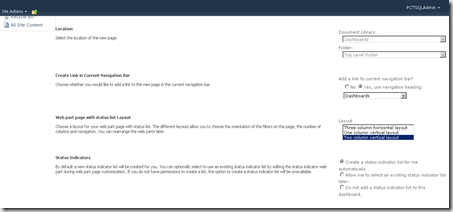
4. Select the layout from the list
Add a status indicator to a Status List
You have to create a Status List to create a status indicator. Click new on Status List tool bar as shown below
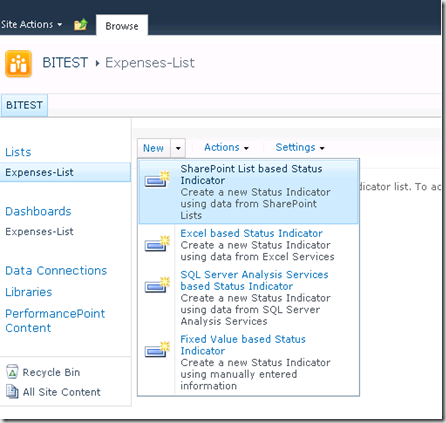
Select the indicator type from the available options, in this example I am using SharePoint List based Status Indicator
SharePoint List based Status Indicator
To create a new status indicator that is based on a SharePoint list
In the list url box, enter the URL of the list or library
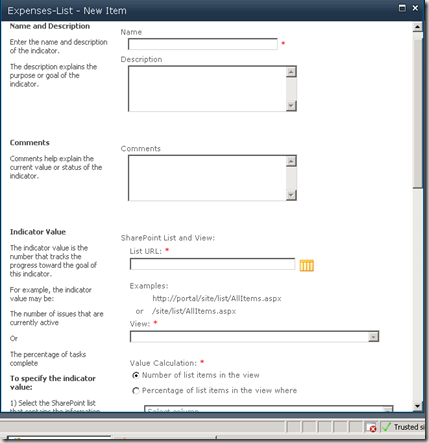
2. Select the view that you want items in the status indicator from view box
3. select the calculation method that you want to use in the Status Indicator
Calculation options
1. Percentage of list items in the view where you can select the criteria
2. select the column and comparison operator from the drop-down list
3. Type the value that you want to use for comparison in the text box
you can either select Number of list items in the view as shown in the above dialogue
4. In the Status Icon Rules section, do the following
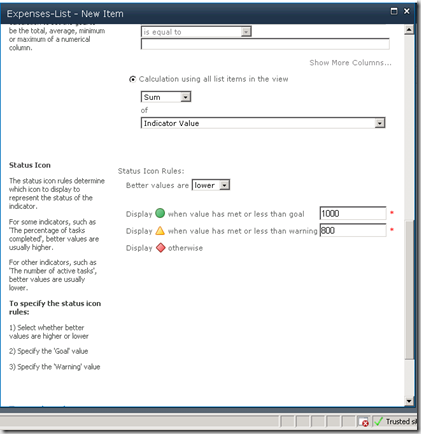
From the Better values are drop down list, select Higher to have SharePoint change icons when increasing values meet or exceed goal.
In the Display when value has met or exceed goal box, type the goal value. when the indicator value reaches this goal, SharePoint changes the icon to show the performance on target
In the Display when value has met or exceeded warning, type the value at which performance is unacceptable.
f58178f1-93b1-4d0e-a4f7-9de8dec7ae0e|0|.0
You can provision managed metadata column into the content type.
You need to add the “Metadata” column into the site columns and content type using element xml file, and also need to connect the field to metadata column in the feature activation.
Here is the solution:
1. You need to add a new field element of the type “TaxonomyFieldType”.
<xml version="1.0" encoding="utf-8" ?>
<Elements xmlns="http://schemas.microsoft.com/sharepoint/">
<Field ID="{46138ADB-1778-4E05-8371-114006F725A0}"
Type="TaxonomyFieldType"
DisplayName="Locations"
ShowField="Term1033"
Required="TRUE"
EnforceUniqueValues="FALSE"
Group="_Custom"
StaticName="Locations"
Name="Locations"
/>
</Elements>
2. Add this filed to the content type, just need to add a new “FieldRef”
<FieldRef ID="{46138ADB-1778-4E05-8371-114006F725A0}" Name="Locations"/>
3. Now we have to connect this field to managed metadata service(MMS).
For this we need to create an event receiver for the feature. Right click on the feature and select “Add event receiver”.
Uncomment the “feature activate” code and replace it with the following code.
public override void FeatureActivated(SPFeatureReceiverProperties properties)
{
SPSite site = properties.Feature.Parent as SPSite;
Guid fieldId = new Guid(“{46138ADB-1778-4E05-8371-114006F725A0}"
if (site.RootWeb.Fields.Contains(fieldId))
{
TaxonomySession session = new TaxonomySession(site);
if (session.TermStores.Count != 0)
{
var termStore = session.TermStores["Managed Metadata Service"];
var group = termStore.Groups.GetByName("Locations Group");
var termSet = group.TermSets["Towns"];
TaxonomyField field = site.RootWeb.Fields[fieldId] as TaxonomyField;
field.SspId = termSet.TermStore.Id;
field.TermSetId = termSet.Id;
field.TargetTemplate = string.Empty;
field.AnchorId = Guid.Empty;
field.Update();
}
}
}
This method will check if the field has been deployed. We used Guid to retrieve the filed as defined in the XML. Your term store group definition should look like this. 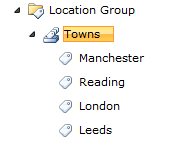
If it is different then you need to change the “group name” and “term set” name in the feature activation according to your MMS environment.
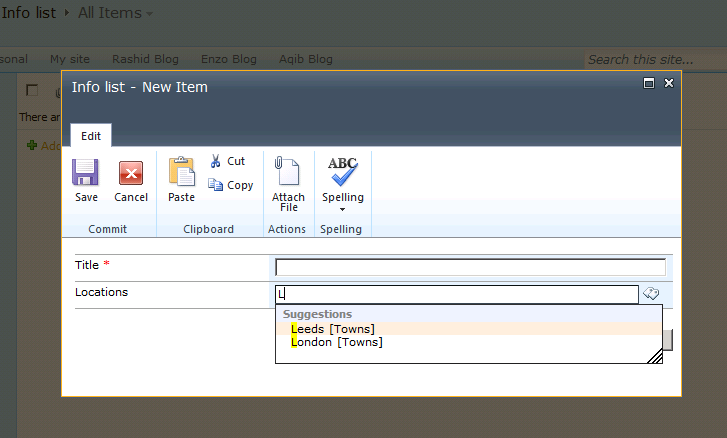
Now you deploy your content type and can test it by creating a new list from that content type.
The result with the metadata column is shown in the below picture.
95834acb-81b6-4ff5-a0a4-95507779e108|0|.0