
November 22, 2011 05:33 by
 darwin
cd6b0d12-55b2-437d-9816-68f6804d267d|0|.0
November 14, 2011 06:25 by
darwinHello, howdy? Today tutorial will explain how to upgrade SharePoint 2007 to SharePoint 2010.
Upgrade Steps
Run the Pre-Upgrade Check on the SharePoint 2007 Server
Execute the following command from the command line on the SharePoint 2007 server hosting the database to be upgraded:
stsadm –o preupgradecheck
This will scan the server for potential problems that may cause errors during the upgrade process.

Review the log file to get specifics on any issues. The most likely cause will be features or customizations, so make sure that you uninstall any features or customizations that aren’t necessary on the new server.
Back Up Your 2007 Content Database
Back up your 2007 content database from SQL Management Studio on the SharePoint 2007 server, and put the backup file somewhere it is accessible from the new SharePoint 2010 Server instance.

Restore the 2007 Content Database to the SharePoint 2010 Database Instance
Connect to the SQL Server Instance hosting your SharePoint 2010 installation’s databases. Restore the legacy content database from the backup file created in the step above.

Create a New SharePoint Web Application
Note: If you have a Web Application created that you plan on using, skip this step and move onto the next step, “Detatch Any Content Databases from the Target Web Application”.
In Central Administration, select “Application Management” from the left navigation pane, and Manage Web Applications under the Web Applications heading.
Click the “New” button on the ribbon toolbar.

Under the “Database Name and Authentication” section, add “DELETETHIS” or something similar to the end of the database name to differentiate it. We will be removing and deleting the generated content database.

Once completed, you should see the following success dialog:

Detach Any Content Databases from the Target Web Application
In Central Administration –> Application Management, select “Manage Content Databases” under the Database heading.
Select the target web application in the “Web Application” drop-down box at the top left, if it is not already selected.

Ensure there are no content databases for the target web application. If the list contains any content databases, click on each content database name. On the “Manage Content Database Settings” screen, select the “remove content database” checkbox and click OK.

Note: Make sure to log into your SharePoint 2010 SQL Server Instance at your convenience and delete any orphaned content databases that were removed from the web application in the step above.
Run The Powershell Test-SPContentDatabase Cmdlet
Launch the SharePoint 2010 Management Shell available under Start->Programs –> Microsoft SharePoint 2010 Products. (Note: If running on a development/client instance on Windows 7 x64, ensure you launch the management console with administrative privileges by right clicking the icon and selecting “Run as administrator”).
Run the Test-SPContentDatabase command from the SharePoint 2010 Management Shell PowerShell window with the following syntax:
Test-SPContentDatabase –Name [DBName] –WebApplication [URL]

This tool will scan your Content DB and search for any references to Web Parts or Features that are missing on your SharePoint 2010 installation. Each error will indicate whether or not it will block the upgrade, and gives a useful remedy for each issue.
Any issues not marked as Upgrade Blocking can be resolve post-upgrade.
Restore the Content Database Using STSADM.EXE
Using the stsadm.exe tool, run the addcontentdb command using the syntax below:
stsadm –o addcontentdb –url [URL] –databasename [DBName]

Once executed, the command window will update with a progress indicator as seen in the screenshot above. Once it is complete, you will either receive one of two messages:
Operation Completed Successfully
or
Upgrade completed with errors. Review the upgrade log file located in C:\Program Files\Common Files\Microsoft Shared\Web Server Extensions\14\LOGS\Upgrade-[DateStamp]-[ids].log. The number of errors and warnings is listed at the end of the upgrade log file.
You can also review the upgrade status in the Central Administration web application under Upgrade and Migration –> Check Upgrade Status.

This report contains the location of the log file for the upgrade process for future reference.
Review any upgrade errors and resolve before moving forward.
Accessing the Upgraded Site and Visual Upgrade
Accessing the Upgraded Site
Open a new web browser instance and navigate to the URL for the web application you upgraded.

You will notice the site retains the same SharePoint 2007 look and feel. This was done deliberately to allow upgrading to SharePoint 2010 without introducing drastic interface changes to the client base.
Optional: Visual Upgrade
SharePoint 2010 offers a simple method for upgrading the existing site to the new SharePoint 2010 look-and-feel.
From the Site Actions menu at the top left, click “Visual Upgrade”.

From the “Site Settings –> Title Description and Icon” page, enter any site metadata you want to upgrade, and click the “Update the User Interface” radio button under the “Visual Upgrade” section as seen below. Click “OK”.

You will now be returned back to your site’s main page with the updated SharePoint 2010 look-and-feel.

b59f49f7-ecdd-4843-b873-d23fcf761eb5|0|.0
November 9, 2011 06:54 by
darwinProblem
With evolution of search, different kinds of requirements arise for searching content. One of the requirements we came across was that they wanted to search for content from external locations (i.e. like Google, YouTube and other public facing internet applications).
Solution
SharePoint 2010 has a web part called "Federated Results". This searches content from the configured federated locations (like Google) that search content on provided parameters and generates output.
In this article, we will be concentrating on how to search content from such external applications. For this article, we will take "YouTube" as an external location. To define a federated (external) location, go to Central Administration > Application Management > Service Applications > Manage Service Applications > Search Service Applications. Click on "Federated Locations" under "Queries and Results" category.

Add a new location. We will first fill the general information: Location name (Youtube), display name (Youtube) and description (any suitable description) which makes a location unique.

Moving ahead to the Location Information category, we need to select the protocol which we will search content (i.e either Search index on the server, Fast index or opentext 1.0/1.1). For our requirement to define the YouTube location, we will select the Opentext protocol.
We also need to provide one mandatory detail which is the Query Template - which mentions from which location we will search and what will be the search parameter.
For our requirement we need to mention, "http://www.youtube.com/rss/tag/{searchTerms}.rss" where "searchTerms" will be the content searched in search box. Optionally, we can also provide a link for "More Results" that will appear at the bottom of search (as shown in the image below).
Leave the rest of the options to defaults.
Click on OK and add location.

Perform a full incremental crawl after the location is created.
Now go to the web application > search center results page and add a web part named "Federated Results" from "Search" Categories.

Edit the Web Part properties and browse to the Location section under Location Properties. If everything above is performed accurately, an option named "Youtube" will appear. Select it and apply changes.

Now we will search some content like "Microsoft" and we could see that with the search core results, a column of search results appears on right side of the screen which provides search results related to "microsoft" from youtube.

By implementing a process this way, it can reduce overburden of configuration and management of searching from federated locations.
523a1f03-1ced-4c5a-8717-91d6f3309007|1|4.0
ac5f2c85-b9e9-42bf-9dbf-112c15db37b1|0|.0
4e6c5e8f-fafc-4522-9014-3b41451cb7b1|0|.0
Starting from 7th Nov 2011, ASPHostCentral.com starts to offer a hosting service located in our prestigious Amsterdam (Netherland) Data Center. For further information, please click here.
For all our new customers who wish to have their sites activated on our Amsterdam (Netherland) data center, you must indicate your request on our order form at https://secure.asphostcentral.com. For our existing customers, a one-time migration fee applies to all requests on our Amsterdam (Netherland) data center and please creates a ticket from our Help Desk to signal your interest.
Our new data center in Amsterdam provides businesses across Europe region. The Amsterdam data center is complemented by new points of presence (PoPs) in Europe that will provide millions of new users with a direct, dedicated path to our Network, providing lower latency and a superior end user experience.
Network Details
Our global network seamlessly integrates three distinct and redundant network architectures—Public, Private, and Data Center to Data Center—into the industry’s first Network-Within-a-Network topology for maximum accessibility, security, and control.
We leverage best-in-class connectivity and technology to innovate industry-leading, fully automated solutions that empower enterprises with complete access, control, security, and scalability. With this insightful strategy and our peerless technical execution, we have created the truly virtual data center—and made traditional hosting and managed/unmanaged services obsolete.
We are proud of our high speed connection. In fact, one of our most frequent compliments from our customers is how fast their site loads... read on and you will see why. When you combine high speed connectivity and high quality equipment, you get a fast and reliable web site. We have invested in the equipment and staff so you can rest assured that your site will load fast every time. We host sites all over the world, and with our multiple backbone connections, your customers will get through to your site fast.
For more details, please visit ASPHostCentral.com website.
45c8f4c1-7fbe-4981-be8e-f8ddcffabf18|0|.0
This morning I tried to upload a video file to our SharePoint 2010 install in preparation for a presentation tonight and then realised that the default 50mb file size limit was still set so while I was changing the settings to allow larger files I thought I would do a quick post on how/where the setting is and what to change.
First of all login to Central Admin and navigate to
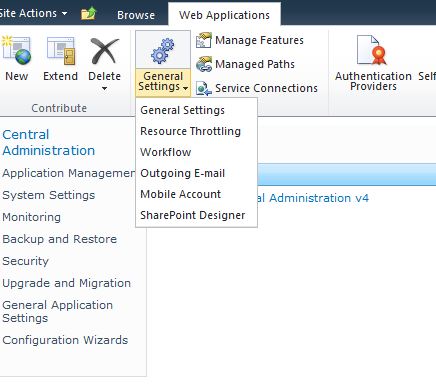
Central Administration -> Application Management -> Manage Web Applications
Once there highlight the web application that you want to change and then click on general settings
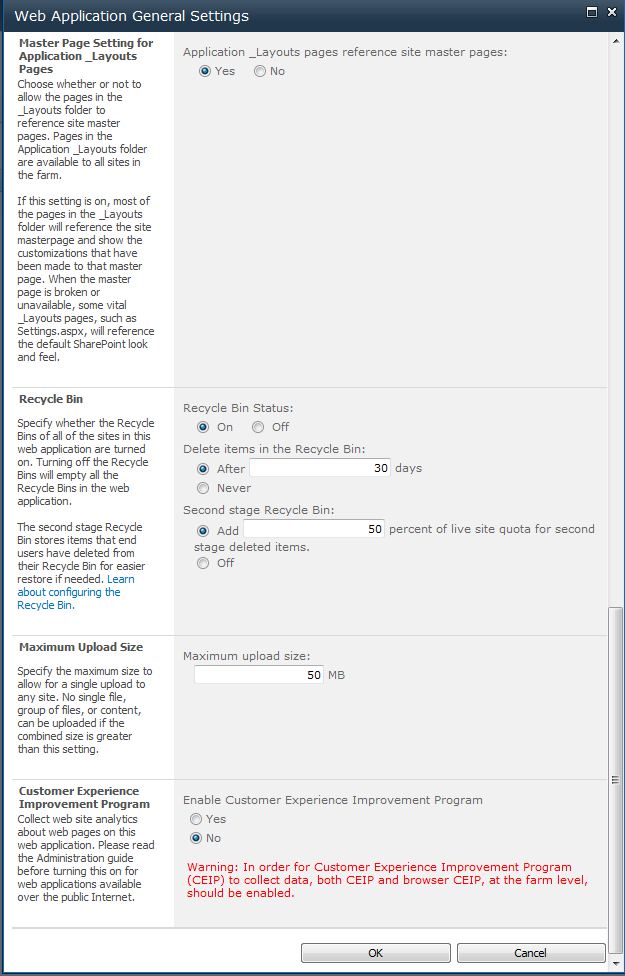
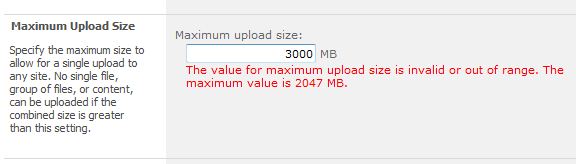
Once in general settings scroll to the bottom of the list and you will see the maximum upload size the default setting is 50mb this can be can set to a maximum size of 2047mb. If you try to go beyond this it does flag up and tell you that you have exceeded the Maximum size.
02e236b8-acc0-4e06-842a-81b142736f4c|0|.0