
November 22, 2011 05:33 by
 darwin
cd6b0d12-55b2-437d-9816-68f6804d267d|0|.0
November 14, 2011 06:25 by
darwinHello, howdy? Today tutorial will explain how to upgrade SharePoint 2007 to SharePoint 2010.
Upgrade Steps
Run the Pre-Upgrade Check on the SharePoint 2007 Server
Execute the following command from the command line on the SharePoint 2007 server hosting the database to be upgraded:
stsadm –o preupgradecheck
This will scan the server for potential problems that may cause errors during the upgrade process.

Review the log file to get specifics on any issues. The most likely cause will be features or customizations, so make sure that you uninstall any features or customizations that aren’t necessary on the new server.
Back Up Your 2007 Content Database
Back up your 2007 content database from SQL Management Studio on the SharePoint 2007 server, and put the backup file somewhere it is accessible from the new SharePoint 2010 Server instance.

Restore the 2007 Content Database to the SharePoint 2010 Database Instance
Connect to the SQL Server Instance hosting your SharePoint 2010 installation’s databases. Restore the legacy content database from the backup file created in the step above.

Create a New SharePoint Web Application
Note: If you have a Web Application created that you plan on using, skip this step and move onto the next step, “Detatch Any Content Databases from the Target Web Application”.
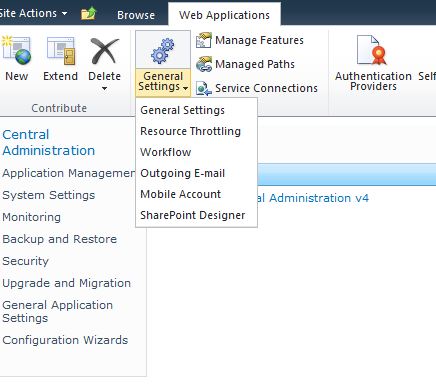
In Central Administration, select “Application Management” from the left navigation pane, and Manage Web Applications under the Web Applications heading.
Click the “New” button on the ribbon toolbar.

Under the “Database Name and Authentication” section, add “DELETETHIS” or something similar to the end of the database name to differentiate it. We will be removing and deleting the generated content database.

Once completed, you should see the following success dialog:

Detach Any Content Databases from the Target Web Application
In Central Administration –> Application Management, select “Manage Content Databases” under the Database heading.
Select the target web application in the “Web Application” drop-down box at the top left, if it is not already selected.

Ensure there are no content databases for the target web application. If the list contains any content databases, click on each content database name. On the “Manage Content Database Settings” screen, select the “remove content database” checkbox and click OK.

Note: Make sure to log into your SharePoint 2010 SQL Server Instance at your convenience and delete any orphaned content databases that were removed from the web application in the step above.
Run The Powershell Test-SPContentDatabase Cmdlet
Launch the SharePoint 2010 Management Shell available under Start->Programs –> Microsoft SharePoint 2010 Products. (Note: If running on a development/client instance on Windows 7 x64, ensure you launch the management console with administrative privileges by right clicking the icon and selecting “Run as administrator”).
Run the Test-SPContentDatabase command from the SharePoint 2010 Management Shell PowerShell window with the following syntax:
Test-SPContentDatabase –Name [DBName] –WebApplication [URL]

This tool will scan your Content DB and search for any references to Web Parts or Features that are missing on your SharePoint 2010 installation. Each error will indicate whether or not it will block the upgrade, and gives a useful remedy for each issue.
Any issues not marked as Upgrade Blocking can be resolve post-upgrade.
Restore the Content Database Using STSADM.EXE
Using the stsadm.exe tool, run the addcontentdb command using the syntax below:
stsadm –o addcontentdb –url [URL] –databasename [DBName]

Once executed, the command window will update with a progress indicator as seen in the screenshot above. Once it is complete, you will either receive one of two messages:
Operation Completed Successfully
or
Upgrade completed with errors. Review the upgrade log file located in C:\Program Files\Common Files\Microsoft Shared\Web Server Extensions\14\LOGS\Upgrade-[DateStamp]-[ids].log. The number of errors and warnings is listed at the end of the upgrade log file.
You can also review the upgrade status in the Central Administration web application under Upgrade and Migration –> Check Upgrade Status.

This report contains the location of the log file for the upgrade process for future reference.
Review any upgrade errors and resolve before moving forward.
Accessing the Upgraded Site and Visual Upgrade
Accessing the Upgraded Site
Open a new web browser instance and navigate to the URL for the web application you upgraded.

You will notice the site retains the same SharePoint 2007 look and feel. This was done deliberately to allow upgrading to SharePoint 2010 without introducing drastic interface changes to the client base.
Optional: Visual Upgrade
SharePoint 2010 offers a simple method for upgrading the existing site to the new SharePoint 2010 look-and-feel.
From the Site Actions menu at the top left, click “Visual Upgrade”.

From the “Site Settings –> Title Description and Icon” page, enter any site metadata you want to upgrade, and click the “Update the User Interface” radio button under the “Visual Upgrade” section as seen below. Click “OK”.

You will now be returned back to your site’s main page with the updated SharePoint 2010 look-and-feel.

b59f49f7-ecdd-4843-b873-d23fcf761eb5|0|.0
November 9, 2011 06:54 by
darwinProblem
With evolution of search, different kinds of requirements arise for searching content. One of the requirements we came across was that they wanted to search for content from external locations (i.e. like Google, YouTube and other public facing internet applications).
Solution
SharePoint 2010 has a web part called "Federated Results". This searches content from the configured federated locations (like Google) that search content on provided parameters and generates output.
In this article, we will be concentrating on how to search content from such external applications. For this article, we will take "YouTube" as an external location. To define a federated (external) location, go to Central Administration > Application Management > Service Applications > Manage Service Applications > Search Service Applications. Click on "Federated Locations" under "Queries and Results" category.

Add a new location. We will first fill the general information: Location name (Youtube), display name (Youtube) and description (any suitable description) which makes a location unique.

Moving ahead to the Location Information category, we need to select the protocol which we will search content (i.e either Search index on the server, Fast index or opentext 1.0/1.1). For our requirement to define the YouTube location, we will select the Opentext protocol.
We also need to provide one mandatory detail which is the Query Template - which mentions from which location we will search and what will be the search parameter.
For our requirement we need to mention, "http://www.youtube.com/rss/tag/{searchTerms}.rss" where "searchTerms" will be the content searched in search box. Optionally, we can also provide a link for "More Results" that will appear at the bottom of search (as shown in the image below).
Leave the rest of the options to defaults.
Click on OK and add location.

Perform a full incremental crawl after the location is created.
Now go to the web application > search center results page and add a web part named "Federated Results" from "Search" Categories.

Edit the Web Part properties and browse to the Location section under Location Properties. If everything above is performed accurately, an option named "Youtube" will appear. Select it and apply changes.

Now we will search some content like "Microsoft" and we could see that with the search core results, a column of search results appears on right side of the screen which provides search results related to "microsoft" from youtube.

By implementing a process this way, it can reduce overburden of configuration and management of searching from federated locations.
523a1f03-1ced-4c5a-8717-91d6f3309007|1|4.0
ac5f2c85-b9e9-42bf-9dbf-112c15db37b1|0|.0
4e6c5e8f-fafc-4522-9014-3b41451cb7b1|0|.0
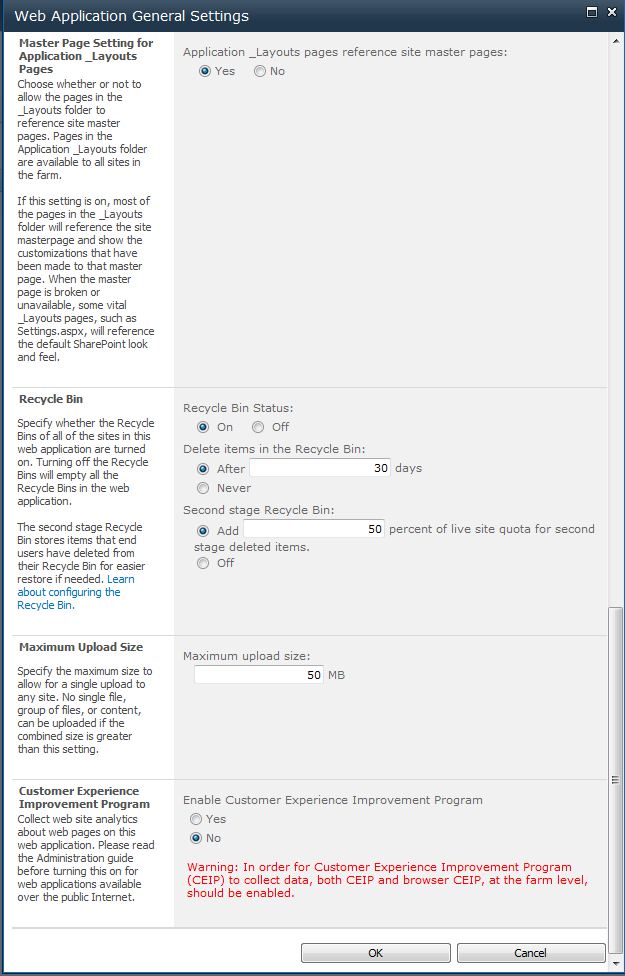
This morning I tried to upload a video file to our SharePoint 2010 install in preparation for a presentation tonight and then realised that the default 50mb file size limit was still set so while I was changing the settings to allow larger files I thought I would do a quick post on how/where the setting is and what to change.
First of all login to Central Admin and navigate to
Central Administration -> Application Management -> Manage Web Applications
Once there highlight the web application that you want to change and then click on general settings
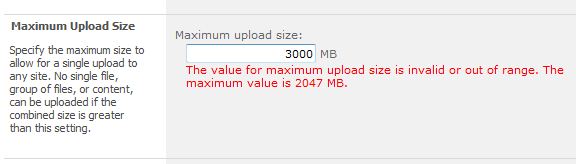
Once in general settings scroll to the bottom of the list and you will see the maximum upload size the default setting is 50mb this can be can set to a maximum size of 2047mb. If you try to go beyond this it does flag up and tell you that you have exceeded the Maximum size.
02e236b8-acc0-4e06-842a-81b142736f4c|0|.0
Sharepoint Document Management is among the most well-respected and reputed of all document management systems. The proper and organized management of documents is essential to the success of any business. Sharepoint is one of the better systems designed to help companies expertly manage their documents.
Sharepoint gives organizations the tools to handle day-to-day operations with programs that they are already familiar with, for instance, Microsoft Office applications such as Word and Outlook. Sharepoint also supports every stage of the document life cycle.
ASPHostCentral.com, as one of the SharePoint 2010 Hosting Providers, proudly confirms that we do support both SharePoint Foundation 2010 and SharePoint 2010 Server Hosting.
During the document management planning process, companies tend to follow certain steps. They often times first determine document management roles. This will generally involve determining who in the organization will be involved in the document management process and in what role. Sharepoint can help individuals identify who these employees will be. This can be especially helpful for companies or executives who don’t have much experience in this regard.
Next, it will be necessary for organizations to figure out what documents will be needed. These will include forms used daily and those that will only be used sparingly. Again, companies will find that Sharepoint will walk them through this process.
The proper organization of documents is important to every company. When it is done correctly and in a way that is intuitive to those who will be using the documents, life becomes much easier for everyone involved. Using Sharepoint, companies will find that they are able to organize documents in a variety of ways including document libraries and records repositories, amongst others.
In addition to the aforementioned, companies will also find that they are able to organize documents based on content type (policies, metadata, workflow processes, etc.). This helps create much needed consistency when it comes to the management of a company’s documents, which is extremely important. Having a document management system in place which that makes accessing and working with documents easy, will help companies save both time and money. Workflow planning, content control and the development of information management policies are also made possible using Sharepoint.
Overall, Sharepoint is a very good document management system. The proper management of documents is crucial to the smooth running of an office or organization. Document sharing, collaborative authoring, archiving and keeping confidential documents protected are just a few of the document management capabilities Sharepoint offers users. Companies in need of a quality system to manage their documents should consider it. It will require that a company own certain hardware and software programs, which is something that will need to be taken into consideration before a company opts to use it as their document management system
0a988dda-32e8-447c-be0c-ca19288fe2ea|0|.0
If you are looking for a web hosting plan that works as hard as you do then SharePoint hosting 2010 is exactly what you need to get the job done. As a matter of fact, SharePoint hosting services provides you with an easy way to build a top performing team. As you begin comparing different plans you will have a whole new perspective on the best methods for communicating with your team.
SharePoint hosting 2010 gives you the competitive edge necessary for collaborating and connecting with your employees on a daily basis. Thanks in part to the latest technology, SharePoint hosting services puts you in absolute control of all your data and places all your documents at your fingertips with a few clicks of the mouse. Stay in contact with an unlimited number of employees in confidence, knowing that your information is being transmitted over a secure network.
To get remarkable results, you have to choose the SharePoint hosting 2010 plan that compliments your business. Think carefully about the amount of disk space you will need to accommodate your staff because the cost of SharePoint hosting services will vary based on that factor. You can get as little as 500MB of disk space or as much as 50GB of disk space.
Each SharePoint hosting plan has the added benefit of project collaboration, document sharing and mobile access for every single customer. No doubt about it, SharePoint Hosting 2010 gives you the clear advantage by helping you bring your company together in a social networking environment. You won’t be disappointed because you will also receive free SharePoint templates to enhance every area of your business. Use them to manage your help desk or track a sales campaign.
Everything you need to create the ultimate virtual work environment can be found in SharePoint hosting services. Everyone on your team will be able to work immediately on documents being stored on the hosted SharePoint WSS in a central location. What’s more, Microsoft Office applications flow in a natural and seamless way with SharePoint 2010 hosting.
Give every staff member a blog to share company information and ideas on specific documents when you host with SharePoint. You’ll absolutely love being able to set up and share calendars among team members. Mobile access is also a dynamic feature that you will come to appreciate when you choose SharePoint hosting.
An exciting new way to share contact information with the members of your team is to use SharePoint to synchronize your contact list with Microsoft Outlook and your mobile phone. Task management is a SharePoint hosting feature that nearly all managers appreciate because specific tasks can be created, listed and assigned quickly. Plus, every member will have the opportunity to monitor how a project is unfolding on an ongoing basis.
SharePoint hosting 2010 is definitely the best fit for tomorrow’s business needs. It comes through in a clutch and more importantly, it really works. Bear in mind that SharePoint offers both shared and dedicated hosting plans and you can choose based on what is appropriate for your employees. If you want a automated hosting solution that practically runs itself, and saves you money, then SharePoint hosting will definitely keep you ahead of the game and help your entire team work smarter.
cdcd4622-d118-4d2d-8967-0409f56f9375|0|.0
7ee83e5f-2821-4837-8016-195e4e7de0ed|0|.0
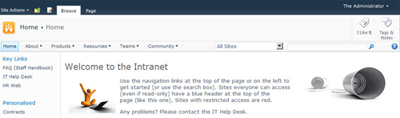
In SharePoint 2007, if you created a new site collection using the ‘Collaboration Portal’ template, it would come with a number of sites, including the Search Center. In SharePoint 2010, this is no longer the case. There isn’t a Collaboration Portal template for starters, the nearest you’ll find is the Enterprise Wiki template which is my recommended starting point for Intranets, KM and Collaborative Sites. (Side note: Another example of poor usability on Microsoft’s part. The Enterprise Wiki template is available in both the Standard and Enterprise editions of SharePoint 2010. When you read about features with ‘Enterprise’ in the title, don’t assume they are limited to the Enterprise Edition, in most cases they are also available in Standard.)
In SharePoint 2010, the clue is in the search box:

When you create a new site collection, the default search settings limit search to within the current site only and uses built-in search pages. If you want to search across multiple sites (a fairly normal requirement for most internal SharePoint deployments), use search scopes and configure different types of results pages, you will be wanting a dedicated search site. Here’s what to do:
Create a Search site
1. At the root of the site collection where you want the Search site to live, click Site Actions and select ‘New Site’
2. Select the search site template you want to use
3. Enter a title and URL (Search works for me…) and create the site
There are up to three search site templates to choose from (and you should use a search template if you don’t want to create a lot of extra work for yourself setting up search query and results pages):
1. Basic Search – available with all versions of SharePoint
2. Enterprise Search – requires SharePoint 2010 Server: Standard or Enterprise edition (yes, another of those ‘Enterprise’ features also available in Standard)
3. FAST Search – requires SharePoint 2010 Server Enterprise Edition (or FAST add-on/dedicated)
The search query box is automatically integrated every SharePoint site within the global navigation bar (as shown in the first image above). Unless you particularly want to also have the Search site listed in navigation, go into the Navigation settings and hide it.
Configure Search Settings
Once you’ve got your search site, you can now configure the search settings to use it. This step needs to be repeated for each site collection that you want to point to the Search site.
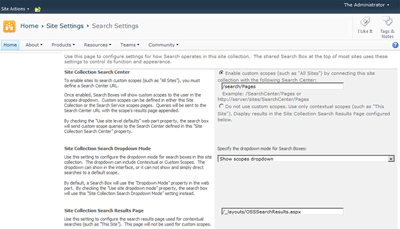
1. At the root of the site collection, go to Site Actions – Site Settings.
2. Under Site Collection Administration, click on Search Settings
3. Within Search Settings:
- For the Site Collection Search Center, enter the URL to your search site in the format /search/Pages (replace the word ‘search’ with the site URL for your search site, if different))
- In Site Collection Search Scopes dropdown mode, select ‘Show search scopes’
The image below shows the settings for my demo machine:
4. Click OK and you’re done.
Once the search settings are configured, the search box will show scopes with the default set to search across all sites instead of just the current site:
Don’t forget, you’ll need to configure search settings for each site collection that you want to point to the Search site. Whilst the URL will be relative for the site collection where the search site is located, for all other site collections you will need to enter the full path (for example, on my demo the URL is http://sp2010/search/ for all other site collections)
Enter a search query in the new search box and you will be routed to the Search site to display results:
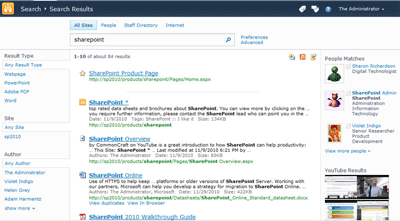
In the image above, I’ve configured the default results page in the Search site to also include federated search results. When I enter the query ‘SharePoint’ I can see documents and items on the Intranet (along with refiners on the left to filter results), people who have SharePoint in their profile and federated results YouTube.
a04a41a6-fcfb-428b-8288-4aaf2ab40bba|1|1.0