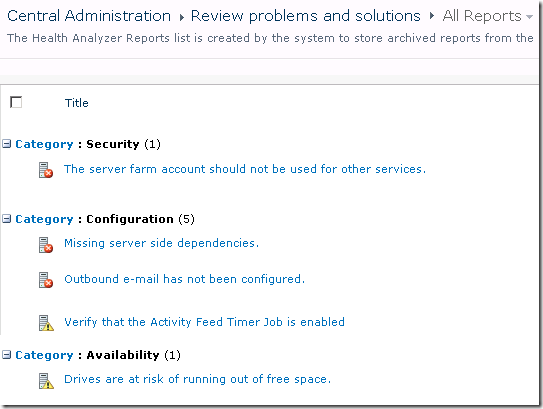
The SharePoint 2010 Health Analyzer is a great way of getting information about the state of your SharePoint farm. It checks things including disk space and database fragmentation and other security, performance and configuration issues. If the health analyzer finds issues you are presented with a message when you browse to the Central Administration site. There is also a link to find out details of all problems that were found.

One thing to note, however, is that it can take a few days or weeks before all the health rules are run on the default schedules. When building a new farm it can be useful to get instant feedback, so you can make sure the new installation is in a healthy state. Did you remember to remove the farm account from the administrators group after setting up User Profile Synchronization? I find this helpful as a consultant as I can rectify issues such as disk space or other problems while I’m on-site with a client and avoid having to return if something is missed.
To get instant feedback you can run all the health analysis jobs immediately through PowerShell. Note that this will place some load on your system so running this on a live environment should be done with caution but in the case of a fresh build with no users that is unlikely to be an issue.
To run all the jobs immediately fire up a SharePoint 2010 Management Shell as a farm administrator and drop in the following PowerShell:
$jobs = Get-SPTimerJob | Where {$_.DisplayName -match "Health Analysis Job"}
foreach($job in $jobs) {
Write-Host "Running" . $job.DisplayName
$job.RunNow()
}
You should now see any problems appear in the Health Analyser screen, ready for you to address while you are on site before the client sees an angry red message when they use Central Administration the next day. Note this can take a few seconds to update so check the timer job history or the modified column to ensure the latest results are showing.
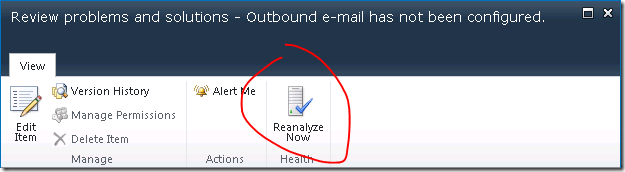
Once you have fixed the issues you can either run the PowerShell again or check the rules individually using the Reanalyze Now button that is displayed within each problem.
Missing server side dependencies.
Explanation: [MissingWebPart] WebPart class [8d6034c4-a416-e535-281a-6b714894e1aa] is referenced [6] times in the database [AdminContentDB], but is not installed on the current farm. Please install any feature/solution which contains this web part. One or more web parts are referenced in the database [AdminContentDB], but are not installed on the current farm. Please install any feature or solution which contains these web parts.
Solution: Following the steps in the article Missing Server Side Dependencies – 8d6034c4-a416-e535-281a-6b714894e1aa to browse to the SearchAdministration.aspx and SearchFarmDashboard.aspx in Central Adminstration and perform an iisreset seemed to fix the issue for me.
The server farm account should not be used for other services.
Explanation: DOMAIN\spfarm, the account used for the SharePoint timer service and the central administration site, is highly privileged and should not be used for any other services on any machines in the server farm. The following services were found to use this account: User Profile Synchronization Service(Windows Service)
Solution: Unfortunately I don’t have an easy fix for this one (assuming it is referring to the User Profile Service – any other services should not be running as the farm account). Spence and Spence on TechNet both indicate the farm account must be used to run the User Profile Synchronization service application. Changing this to any other managed account seems to break the UPS app so if you know how to avoid this please let me know.
Verify that the Activity Feed Timer Job is enabled
Explanation:The newsfeed displayed on My Site and Profile pages uses the Activity Feed Timer Job. Without this timer job, no newsfeed will be available on My Site and Profile pages. This also applies to any third-party product that uses this newsfeed.
Solution: Start the User Profile Service Application – Activity Feed Job from the Monitoring > Job Definitions page in Central Administration.
As a side note some of the common non-trivial messages are:
22269d33-58ca-415a-9b14-a8a5a025ae12|1|2.0
Status Indicator is a report type, where it shows and compares the actual performance of particular measure with goal value. Without doing any calculations, you can know the performance of a measure with good status indicator. You can know whether measure results are on target or off target. This post explains how to create a status indicator in SharePoint 2010.
Status Indicator shows name, results and icon. It provides a quick information, green icon indicates good performance, Red icons flags the problem areas and yellow icons warn of potential problems. The typical status indicator looks as follows

Creating status indicator
status indicator is an item in status list in SharePoint. You can create a status list in two ways
1. Create a status list
2. Create a web part with status list
Creating a Status List
Create a Status List in the Business Intelligence Center site in SharePoint. You can add status indicator once you create a list. Steps to create a list
1. click Site Actions, and then select View All Site Content, click create option as shown below
2. On Create page, click the Status List icon
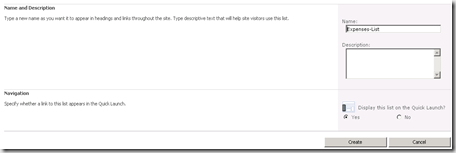
3. Enter name and description for Status List as shown below
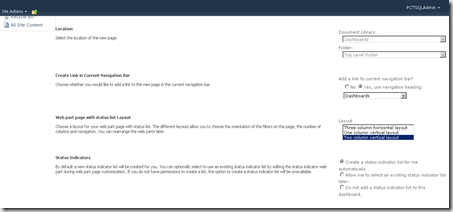
Create a Web Part with Status List, take these steps
1. Click Dashboards from BI site quick launch panel
2. Click Documents tab in the Library Tools group
3. Click New Document, and then select Web Part page with Status List
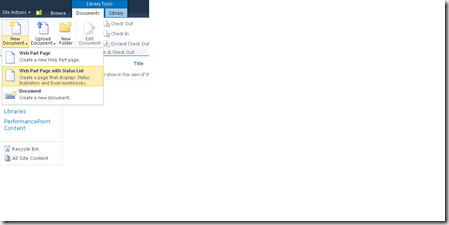
4. Select the layout from the list
Add a status indicator to a Status List
You have to create a Status List to create a status indicator. Click new on Status List tool bar as shown below
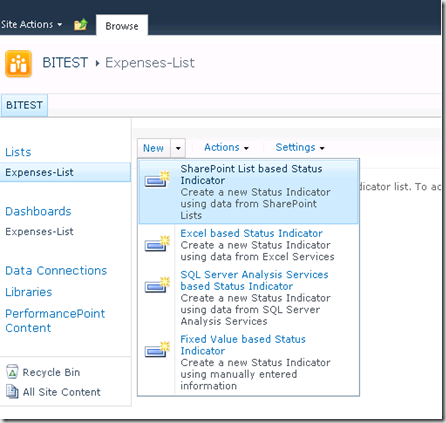
Select the indicator type from the available options, in this example I am using SharePoint List based Status Indicator
SharePoint List based Status Indicator
To create a new status indicator that is based on a SharePoint list
In the list url box, enter the URL of the list or library
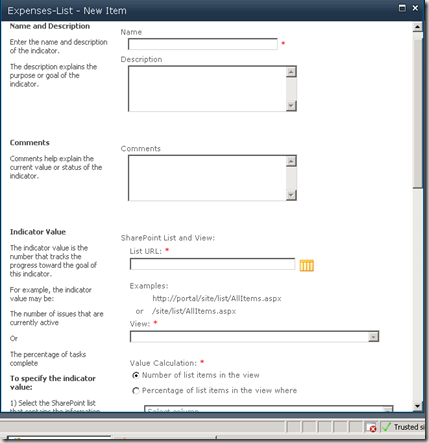
2. Select the view that you want items in the status indicator from view box
3. select the calculation method that you want to use in the Status Indicator
Calculation options
1. Percentage of list items in the view where you can select the criteria
2. select the column and comparison operator from the drop-down list
3. Type the value that you want to use for comparison in the text box
you can either select Number of list items in the view as shown in the above dialogue
4. In the Status Icon Rules section, do the following
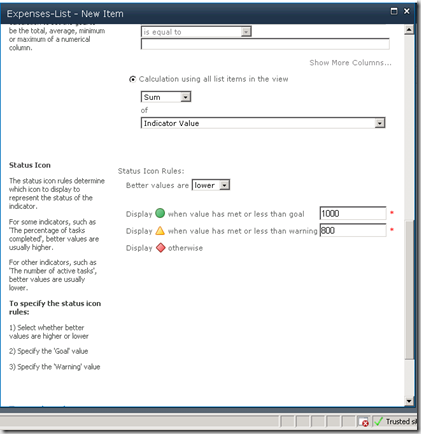
From the Better values are drop down list, select Higher to have SharePoint change icons when increasing values meet or exceed goal.
In the Display when value has met or exceed goal box, type the goal value. when the indicator value reaches this goal, SharePoint changes the icon to show the performance on target
In the Display when value has met or exceeded warning, type the value at which performance is unacceptable.
f58178f1-93b1-4d0e-a4f7-9de8dec7ae0e|0|.0
You can provision managed metadata column into the content type.
You need to add the “Metadata” column into the site columns and content type using element xml file, and also need to connect the field to metadata column in the feature activation.
Here is the solution:
1. You need to add a new field element of the type “TaxonomyFieldType”.
<xml version="1.0" encoding="utf-8" ?>
<Elements xmlns="http://schemas.microsoft.com/sharepoint/">
<Field ID="{46138ADB-1778-4E05-8371-114006F725A0}"
Type="TaxonomyFieldType"
DisplayName="Locations"
ShowField="Term1033"
Required="TRUE"
EnforceUniqueValues="FALSE"
Group="_Custom"
StaticName="Locations"
Name="Locations"
/>
</Elements>
2. Add this filed to the content type, just need to add a new “FieldRef”
<FieldRef ID="{46138ADB-1778-4E05-8371-114006F725A0}" Name="Locations"/>
3. Now we have to connect this field to managed metadata service(MMS).
For this we need to create an event receiver for the feature. Right click on the feature and select “Add event receiver”.
Uncomment the “feature activate” code and replace it with the following code.
public override void FeatureActivated(SPFeatureReceiverProperties properties)
{
SPSite site = properties.Feature.Parent as SPSite;
Guid fieldId = new Guid(“{46138ADB-1778-4E05-8371-114006F725A0}"
if (site.RootWeb.Fields.Contains(fieldId))
{
TaxonomySession session = new TaxonomySession(site);
if (session.TermStores.Count != 0)
{
var termStore = session.TermStores["Managed Metadata Service"];
var group = termStore.Groups.GetByName("Locations Group");
var termSet = group.TermSets["Towns"];
TaxonomyField field = site.RootWeb.Fields[fieldId] as TaxonomyField;
field.SspId = termSet.TermStore.Id;
field.TermSetId = termSet.Id;
field.TargetTemplate = string.Empty;
field.AnchorId = Guid.Empty;
field.Update();
}
}
}
This method will check if the field has been deployed. We used Guid to retrieve the filed as defined in the XML. Your term store group definition should look like this. 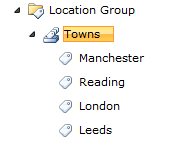
If it is different then you need to change the “group name” and “term set” name in the feature activation according to your MMS environment.
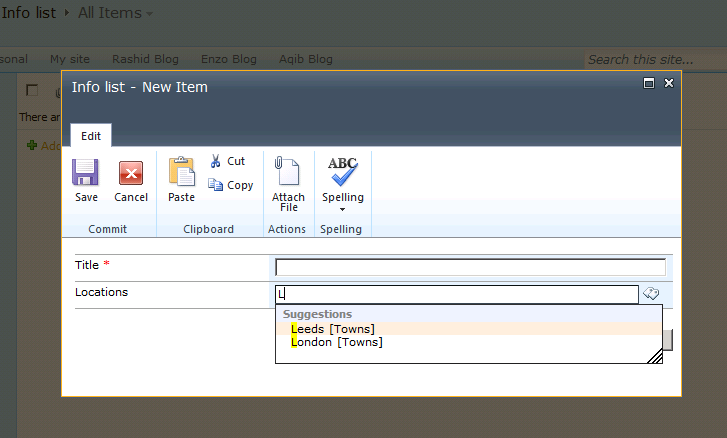
Now you deploy your content type and can test it by creating a new list from that content type.
The result with the metadata column is shown in the below picture.
95834acb-81b6-4ff5-a0a4-95507779e108|0|.0